


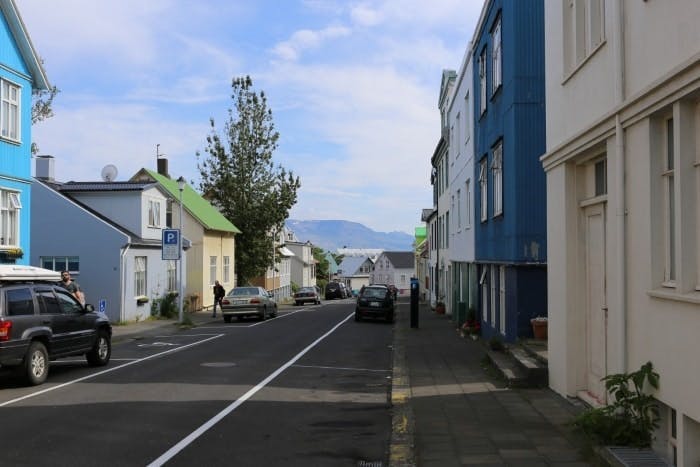
The practical driving test is the most nerve-wracking thing most learner drivers face. One of the areas that has learners sweating the most is manoeuvres. It's understandable—one itsy-bitsy mistake and you could end up failing the test! One of the best ways to avoid this kind of situation, however, is preparation. So, if you're not entirely familiar with all of the driving test manoeuvres you could be asked to demonstrate, you've come to the right place!
We're going to walk you through all of the manoeuvres that you might be expected to carry out in your practical. We'll also look at the ones that have been scrapped since the 2017 test changes. Plus, we'll include some handy manoeuvre instructions!
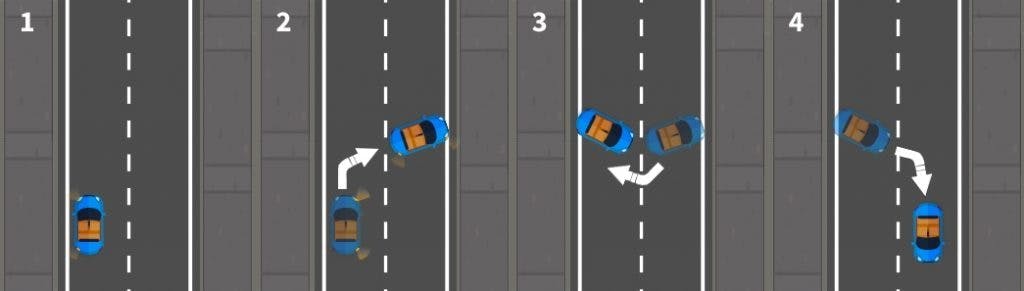
Driving test manoeuvres
Whether you've only just started learning to drive, or you're almost ready to head in for your practical test, it's absolutely vital that you know the driving test manoeuvres you could be asked to demonstrate inside and out. There are three manoeuvres in total, and you will be asked to carry out one of them during your practical. Let's take a closer look at what these manoeuvres are and what else you might need to know.
1. Pulling up on the right
What is it?
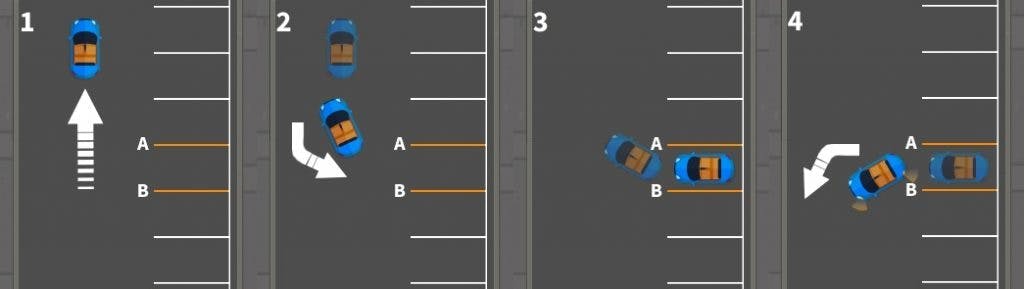
One of the most heavily contested driving test manoeuvres, the pulling up on the right manoeuvre was introduced in December 2017. Why is it so controversial? Well, the Highway Code has always urged drivers not to park against the flow of traffic. The DVSA, however, argues that it's important for drivers to know how to do so, as pulling up on the right is legal, and is the safest option in certain circumstances.
The manoeuvre is broken down into three main parts: pulling up on the right, reversing back 2 car lengths and rejoining traffic.
Example instructions
"I'd like you to pull up on the right-hand side of the road when you decide it's safe to do so. Once you've done so, you will need to reverse back for 2 car lengths—keep close to the kerb".
How to carry it out
We're going to give you a quick overview of the manoeuvre. For a more in-depth look, read up on our pulling up on the right manoeuvre guide.
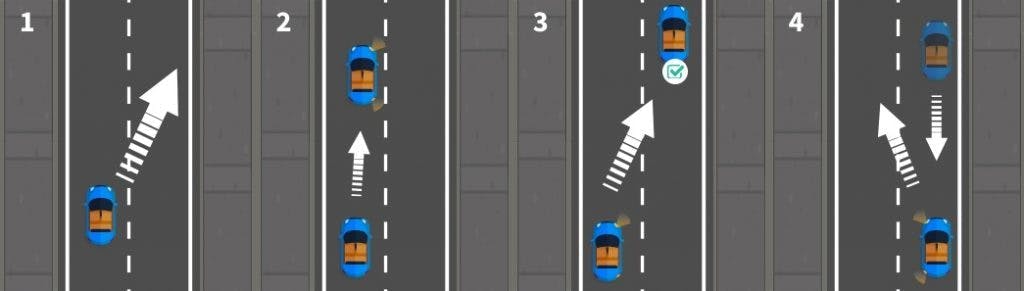
1. Find a suitable location to pull up. Try to avoid parking next to driveways, junctions or bends. It's best to find a spot where you won't be an obstruction to other road users or have your own view obstructed.
2. MSM and correct positioning. Use your Mirrors, Signal, Manoeuvre routine to safely move towards the right-hand lane. Make sure you check your blindspots carefully before you do anything!
3. Pull up on the right. Move in to the right at a shallow angle to avoid hitting the kerb. Try to get your vehicle parallel to the kerb to make the next step easier. Stop the car, use your handbrake and select neutral.
4. Reverse and move off. Check your mirrors and blindspots before slowly reversing for 2 car lengths. Keep looking out for any rogue road users! Come to a stop with your handbrake and neutral. Once asked to do so, move off after checking mirrors and blindspots.
Why it's relevant
Though pulling up on the left is preferable in the vast majority of situations, it's not always possible to do so. This may be the case if, for example, you can only find parking spaces on the right-hand side of the road. In these cases, knowing how to pull up on the right safely will certainly come in handy!
2. Bay parking
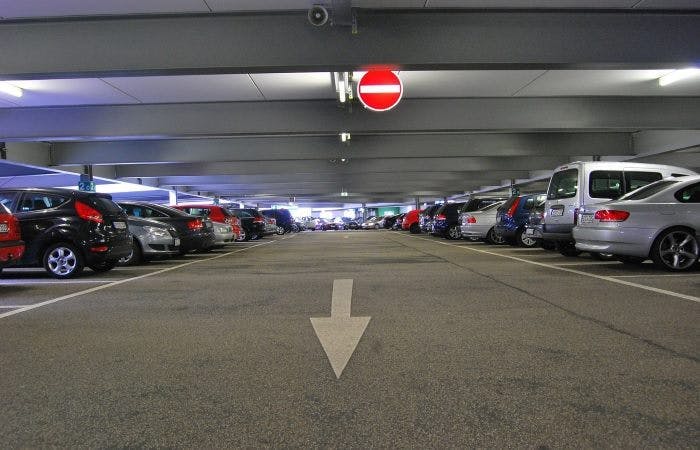
What is it?
Also added to the driving test from December 2017 onward, there are two types of bay parking. You might be expected to demonstrate one of the following:
- Forward bay parking: driving in and reversing out of a parking bay
- Reverse bay parking: reversing in and driving out of a parking bay
Example instructions
Forward bay parking:
"I'd like you to pick a parking bay to drive into—make sure you're inside the lines. Once you've done so, reverse out (left or right) before continuing on."
Reverse bay parking:
"I'd like you to pick a parking bay to reverse into—make sure you're inside the lines. Once you've done so, drive out (left or right) before continuing on."
How to carry it out
We're going to give you a quick overview of the manoeuvre. For a more in depth look, read up on our bay parking manoeuvre guide.
Forward bay parking
1. Pick a bay. Make it easier for yourself and pick a bay on the right. Try to avoid bays that have vehicles on either side—you'll be able to see the parking lines more clearly that way. Keep things slow and steady.
2. Start to move and find your reference point. Move over to the left to give yourself plenty of room. Check your mirrors and blindspots as you make your way towards your point of turn.
3. Steer quickly and move at a slow pace. If the way is completely clear, slowly start to move into the bay with a full right/left lock. Straighten up the vehicle, select neutral and apply your handbrake.
4. Reverse out of the bay. Select reverse and do all-around checks before reversing to your reference point. Next, half turn to the left (or right) until you're clear—then switch to first gear, signal, complete your checks and move off.
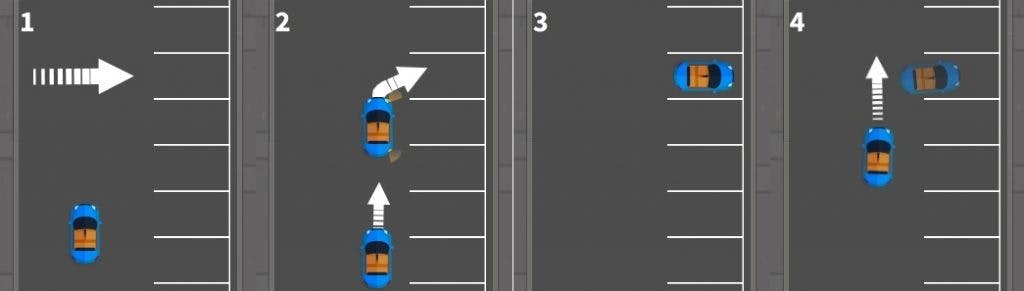
Reverse bay parking
1. Pick a bay. Pick a parking bay that doesn't have vehicles on either side. Try to position yourself in the centre of the road for extra space. Drive 2 car lengths past your chosen bay. Careful! From 2022, you can expect to be given this manoeuvre at any test centre, instead of just those with their own car park.
2. Find your point of turn and steer quickly. Reverse the car until it's at the point of turn (3rd line from the bay), check it's clear and steer quickly with a full-lock to the right (or left).
3. Get into the bay and adjust. Slow and steady does it—keep checking your mirrors and blindspots. You'll be able to see if you're inside the lines of the bay by using your side mirrors.
4. Finish and move off. After straightening up, switch to neutral and apply your handbrake. Once you're good to go, switch to first gear, disengage the handbrake and indicate to the left or right before driving out.
Why it's relevant
If you ever want to use a car park, you'll need to know how to forward or reverse bay park. You'd be hard-pressed to go your entire life without having to use this vital manoeuvre. The safest option, when possible, is the reverse bay parking manoeuvre.
3. Parallel parking
What is it?
The final driving test manoeuvre you might be asked to demonstrate is the parallel park. It involves a driver parking their vehicle parallel to the road, usually in a line of other vehicles. In the test, you'll pull up next to a vehicle in front of your chose parking spot, before reversing into it.
Example instructions
"I'd like you to stop on the left before we reach the next parked car. Then, drive forward and stop next to the car ahead. When you're ready, reverse into the spot behind the other car and park parallel with the kerb."
How to carry it out
We're going to give you a quick overview of the manoeuvre. For a more in depth look, read up on our parallel parking manoeuvre guide.
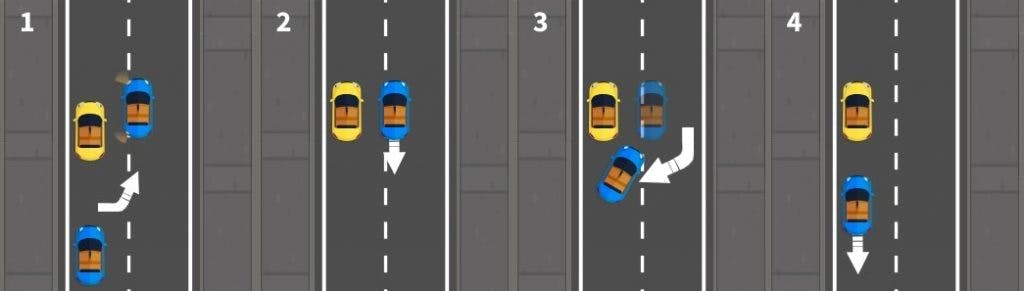
1. Pull alongside the car. Before you move to stop next to the other vehicle, check your mirrors and blindspots—you don't want to get in the way of oncoming traffic. Then, stop the car a bit ahead of the other vehicle and select the reverse gear.
2. MSM and correct positioning. Check your mirrors and blindspots—keeping an eye on the rear window as you start reversing. Line up the rear of your vehicle with the other car's and come to a stop.
3. Find your reference point and reverse into the spot. Start to reverse and quickly steer once to the left. Start to look for your next reference point—when the left corner of your vehicle lines up with the right corner of the other vehicle.
4. Full lock and straighten up. Turn the steering wheel a full lock to the right, all the while doing all-around checks. Straighten up the vehicle, apply the handbrake and select neutral. Move off once you're told to—do your checks again.
Why it's relevant
Much like the bay parking manoeuvre, the parallel parking manoeuvre is vital to get to grips with for everyday life. If you ever need to park outside your house or anywhere in the city (where parking can be very slim), you'll need to be able to parallel park quickly and safely.
Curveball! The Emergency stop

Whilst not strictly a driving test manoeuvre, the emergency stop procedure is something that 1 in 3 candidates must carry out during their practical test. You won't know whether it will be on your test until you're told by the examiner during your practical. As such, it's pretty vital that you how to carry it out just in case.
What is it?
As the name suggests, the emergency stop tests a learner driver's ability to stop their vehicle quickly—without losing control. Though you should be able to avoid most issues on the road with your carefully honed hazard perception skills and defensive driving techniques, it's vital that you know what to do in an emergency.
Example instructions
"I will be asking you to carry out an emergency stop soon. I will do this by telling you to "stop" and raising my hand. When you receive this signal, you will need to stop as quickly and safely as you can. You don't need to worry about looking around—I will make sure it's safe for you to carry out."
How to carry it out
We're going to give you a quick overview of the emergency stop procedure. For a more in depth look, read up on our emergency stop guide.
1. Await instructions. Unlike the driving test manoeuvres, the examiner has to give you a sufficient warning before they ask you to carry out an emergency stop. They'll get you to pull up and then walk you through the instructions.
2. Take action immediately. As soon as you receive the relevant verbal and visual cues, you need to take action. Some cars with ABS (Anti-lock Braking Systems) will require you to depress the clutch and brake pedals at the same time. In most cases, however, you will need to brake and then depress the clutch to avoid coasting. If you're not sure which method to use, ask your instructor for clarification.
3. Observations and move off. You will need to check all of your mirrors and blindspots before you move off—do so in an anticlockwise motion. Once you're sure it's clear, select first gear, disengage the handbrake, signal and move off.
Why it's relevant
It's important to prepare for the worst case scenario so that you don't panic when something bad happens. If there is an emergency and you need to stop your vehicle quickly, e.g., a pedestrian suddenly darts out in front of you, knowing how to carry out an emergency stop could save lives.
Scrapped manoeuvres
With the driving test changes in 2017, the DVSA opted to remove two manoeuvres from the driving test in favour of pulling up on the right and bay parking. Now, it's important to note here that whilst you won't be expected to demonstrate these manoeuvres in your driving test, it doesn't mean you shouldn't know how to carry them out. In fact, the DVSA still encourages instructors to teach students these manoeuvres.
1. Reversing around a corner
What is it?
In case the name didn't clue you in, this manoeuvre involves you driving in reverse around a corner. On the old driving test, you would be expected to do this in three main parts: stopping just before the junction you want to reverse into, driving past and then reversing into it after finding your point of turn.
Example instructions
"I'd like you to reverse around the corner of the next junction. Before you do, you need to drive past it and stop. Then, reverse around the corner and a bit further up into the new road. Try to stay parallel to the kerb as you do."
How to carry it out
We're going to give you a quick overview of the manoeuvre. For a more in depth look, read up on our reversing around a corner manoeuvre guide.
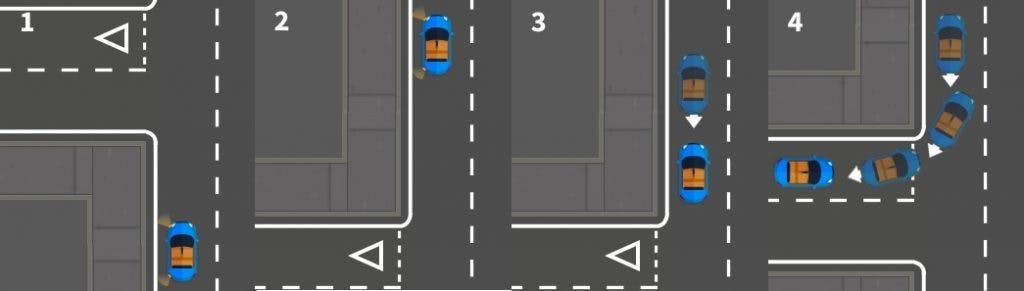
1. Park on the left-hand side. Unless you're practising with your instructor, you won't need to follow this step. If you are, park on the left to give yourself time to prepare for reversing around the corner of your chosen junction.
2. Drive past the corner. If it's clear, drive past your chosen junction and stop just a bit away from the kerb. Check your mirrors and blindspots before switching to reverse.
3. Start moving back to your point of turn. Do all-around checks and start to reverse once it's clear—keeping an eye on the rear window. Come to a stop once the corner of the kerb is in your left-hand side mirror.
4. Reverse slowly around the corner and stop. Slowly reverse whilst steering once to the left. Make sure you're not too close to the kerb as you do so. Once you're on the new road, keep on reversing until you're parallel. Then, either stop or switch to first gear to start moving.
Why it's still relevant
If you ever need to turn your vehicle around, reversing around a corner is one of the easiest ways to do so. Instead of carrying on in the wrong direction, you can reverse into a nearby junction and get on the right path! Remember, though, that the Highway Code advises against reversing onto a main road from a side road or driveway.
2. Turn in the road
What is it?
The final manoeuvre on our list is the turn in the road manoeuvre—otherwise known as the three point turn. This manoeuvre involves a driver turning their vehicle to face the opposite direction. It is usually completed in three turns (hence the name), however, this will vary depending on the driver and the situation.
Example instructions
"Once it's clear, I'd like you to pull up on the left in preparation for turning the vehicle around to face the opposite direction. Try to complete the manoeuvre in as few moves as possible."
How to carry it out
We're going to give you a quick overview of the manoeuvre. For a more in depth look, read up on our turn in the road manoeuvre guide.
1. Stop on the left. Find a safe place to stop—checking your mirrors to make sure it's clear to do so. Signal your intention, pull up and then apply your handbrake and select neutral.
2. Steer to the right. Check that the road is clear of any oncoming traffic, signal right and then move slowly forward. Then, steer quickly a full lock to the right. Once you're 1 metre from the kerb, turn once to the left before stopping.
3. Reverse slowly. Select reverse and check your mirrors and blindspots. Then, slowly move back whilst steering a full left lock. Look over your shoulder to keep an eye on the kerb—once you're 1 metre from the kerb, steer once right and stop.
4. Move off. You're now facing the right direction. All that's left is to check your mirrors and blindspots to make sure it's clear. Then, switch to first gear and move off.
Why it's still relevant
Much like the reverse around a corner manoeuvre, the turn in the road manoeuvre is an ideal solution for when you're looking to change direction. So, if you've realised you're going the wrong way or the road ahead is obstructed, you can turn in the road and get back on track!
Well, that should be everything you could possibly need to know about the driving test manoeuvres and other additional manoeuvres that you should know for day-to-day driving. Make sure that you check out our manoeuvre guides for full in depth directions, a list of what the examiner is looking for and much more!
Driving Test Manoeuvre FAQs
If you want to actually pass your driving test, then no, you can't really refuse to carry out a driving test manoeuvre. If you're worried because of nerves, just take your time and complete the manoeuvre at your own pace—as you would with your instructor. Confused about the instructions given to you? Just ask the examiner to explain them. Outright refusal will just result in your test being terminated.
It depends. If you make a bit of a slip up, e.g., steering the wrong way before quickly correcting yourself, it will, at worst, result in a minor fault. Believe it or not, you are allowed to make some mistakes on your test. If, on the other hand, you do something like mount the kerb, you'll end up with a major fault—resulting in a fail.
You are allowed to wait for the road to clear up before completing a driving test manoeuvre. Of course, if you've been waiting for a while, you will have to go ahead, unless your examiner states otherwise. In this case, oncoming traffic will simply wait for you to complete the manoeuvre. Don't feel pressured into rushing—take your time!
Yes! We cannot stress the importance of learning all manoeuvres enough—regardless of whether they're on the driving test or not. These manoeuvres will end up helping you in the future, so it's definitely worth knowing how to carry them out safely.
It's important to take things slow with your driving test manoeuvres. If you're careful enough, you'll be able to notice when you're slightly off, giving you plenty of time to actually correct your mistake. In this case, you should stop and correct your positioning before continuing on.
Typically speaking, probably not. Driving test examiners have to oversee dozens of driving tests every day. As such, they're more than experienced enough to be able to gauge your vehicle's position on the road without having to get out—they'll just use the side mirrors.
Two car lengths is a popular measurement used in driving test manoeuvres. With standard parking spaces coming in at just under 5 metres, you're looking at two car lengths measuring up to just under 10 metres. Don't worry—you don't have to be exact. The examiner is not going to get out of the car with a measuring tape to check!
Not really. Though you might be worried that you're taking ages whilst carrying out a manoeuvre, in most cases, you're never actually taking as long as you think. You shouldn't rush because you're worried about taking too long. Of course, if you're going over the 4 minute mark, the examiner might give you a nudge to rush you along.
We'd love to let you know about our courses, news and offers via email. You may unsubscribe at any time.